Key Align
A massive keyframe manipulation toolkit covering shift, align, scale, duplicate, value operations, easing, looping, selection, and cleanup — over 60 operations organized into clean sections. Nudge keys by exact frames, snap to playhead or work area, distribute evenly, duplicate with flip, apply loop expressions, and cleanly snap to frame boundaries.

Overview
Key Align is the ultimate keyframe manipulation toolkit for After Effects. It brings together over sixty keyframe operations — shifting, aligning, scaling, duplicating, value editing, easing, looping, selection, and cleanup — all organized into clean collapsible sections. Whether you need to nudge keys by a single frame, stretch an entire animation by exact time, fix overshoot, add loop expressions, or set roving keyframes, it's all one click away. Every section and every button can be shown or hidden from the settings, so you can build a custom panel that shows only the operations you actually use. Selection is automatically preserved across operations so you can chain multiple actions without reselecting.
Features
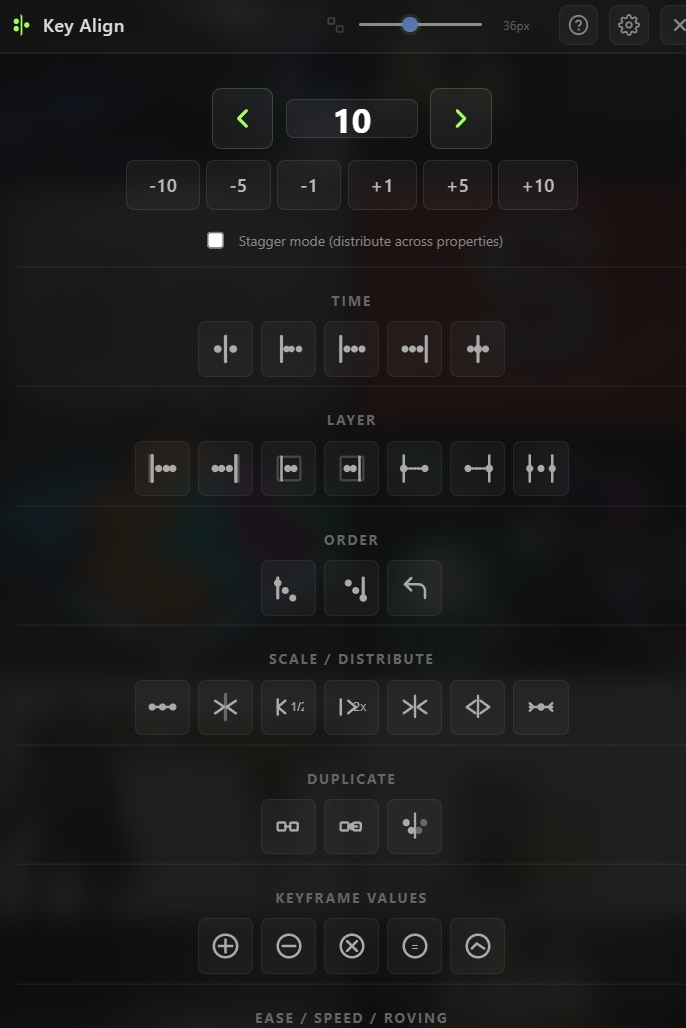
Shift Keys (SHIFT section)
Dedicated primary control for frame-level nudging:
- Large scrub input with ◀ / ▶ arrows for precise frame-by-frame shifting
- Quick preset buttons: −10, −5, −1, +1, +5, +10 frames
- Stagger mode toggle — when enabled, the scrub arrows distribute shifts across properties instead of uniform moves
- Works on any number of selected keyframes across any selected layers
Time Anchors (TIME section)
- Align to Playhead — Move selected keys so the earliest one lands exactly on the current time
- Keys From Playhead — Start the selection at the playhead while keeping the spacing between keys intact
- Align to Comp Start / Align to Comp End — Snap the selection to the beginning or end of the composition
- Center on Playhead — Center the selection's midpoint on the current time
Layer & Work Area (LAYER section)
- Align to Layer In Point / Out Point — Snap to the layer's trim boundaries
- Align to Work Area In / Out — Snap to the composition's work area markers
- Connect First Key to Layer In — Pull the first selected key to the layer's start
- Connect Last Key to Layer Out — Push the last selected key to the layer's end
- Stretch Keys to Layer Trim — Fit the selection exactly within the layer's trim range
- Sequence Across Layers — Distribute selected keys sequentially across multiple layers top-to-bottom
Order Operations (ORDER section)
- Align Left — Snap all keys to the time of the earliest selected key
- Align Right — Snap all keys to the time of the latest selected key
- Reverse Keys — Mirror the selection in time (values stay, timing flips)
Scale & Distribute (SCALE section)
- Distribute Keys Evenly — Space keys uniformly between first and last
- Compress to Playhead — Collapse selection into the current time
- Halve Timing (50% from first) / Double Timing (200% from first) — Quick uniform scaling anchored to the first key
- Tighten 25% / Loosen 400% — Scale around the playhead for quick retiming
- Compress Inwards (50%) / Expand Outwards (200%) — Scale around the selection center
- Stretch Advanced — Opens a prompt for custom stretch in frames, seconds, or percent
Duplicate Operations (DUPLICATE section)
- Duplicate Keys — Copy selected keys right after the last one
- Duplicate & Flip — Ping-pong duplicate (copy + time-reverse)
- Mirror Duplicate around Playhead — Reflect the selection on the other side of the current time
Keyframe Values (KFVAL section)
Direct arithmetic on keyframe values — prompts for amount when needed:
- Add / Subtract / Multiply — Prompt-based value operations
- Set — Overwrite all selected key values with a fixed amount
- Round to nearest — Snap values to a custom step
- Negate (×−1), Absolute (|x|), Floor, Ceiling — One-click value transforms
- Randomize ± — Add random offsets within a prompted range
Easing & Speed (EASE section)
- Constant Speed — Force uniform velocity across the selection
- Set Roving / Unset Roving — Toggle roving keyframes for smooth motion paths
Loop & Cycle (LOOP section)
One-click loop expressions on the selected property:
- Loop Out: Cycle / Ping-Pong / Continue / Offset
- Loop In: Cycle / Ping-Pong
- Clear Expression — Remove any existing expression from the property
Selection Operations (SELECT section)
- Select All Keys on selected properties
- Select First Key Only / Select Last Key Only
- Select Key Nearest Layer In / Out
- Invert Key Selection
- Select in Time Range — Prompt-based range selection around the playhead
Cleanup Operations (CLEAN section)
- Snap Keys to Frame — Align all selected keys to exact frame boundaries
- Fix Overshoot — Automatically clamp runaway bezier curves
- Set to Hold / Linear / Bezier — Force interpolation type on both sides
- Set to Ease Out only / Ease In only — Asymmetric interpolation combinations
Fully Customizable Panel
- Show section headers toggle — hide labels for an even more compact layout
- Individual button visibility — every operation can be turned on or off from the settings cog
- Sections with zero enabled buttons don't render at all, giving you a clean workspace
- Defaults ship with the most common operations enabled; advanced ones stay hidden until you need them
How to Use
1. Select one or more layers and their keyframes in the timeline. Most operations require at least one selected keyframe. 2. Open the Key Align tool from the Quick Tools menu or toolbar. 3. Shift keys by exact frames: - Type or scrub a value in the SHIFT section - Click ◀ to move back, ▶ to move forward - Or click a quick preset (−10, −5, −1, +1, +5, +10) 4. Align keys to a time anchor: - In the TIME section, click any anchor button (Playhead, Comp Start, Comp End, etc.) 5. Align to layer or work area: - In the LAYER section, click any of the layer-relative or work-area buttons 6. Scale or distribute timing: - In the SCALE section, pick any scale preset or click Stretch Advanced for custom values 7. Duplicate keyframes: - In the DUPLICATE section, click Duplicate, Duplicate & Flip, or Mirror Duplicate 8. Edit keyframe values directly: - In the KFVAL section, click any operation (Add, Subtract, Multiply, Set, Round, etc.) - A prompt dialog asks for the amount 9. Apply loop expressions or easing: - In the LOOP section, click any loop type for Out or In - In the EASE section, toggle Constant Speed or Roving 10. Clean up your timeline: - In the CLEAN section, click Snap to Frame, Fix Overshoot, or set interpolation types 11. (Optional) Click the settings cog in the header to hide buttons or sections you don't use.
Notes
- Shift Keys is the most common operation in daily use — keep it visible at the top. The scrub input remembers its last value between sessions.
- Stagger mode in the SHIFT section is powerful for creating offsets across multiple properties at once — great for animating a rig where you want each property to start slightly later.
- Connect First/Last Key to Layer In/Out is the fastest way to build animations that follow layer trim changes automatically. Use it together with Stretch Keys to Layer Trim for perfect layer-bound animations.
- Value operations (Add/Multiply/Round/etc.) are incredibly useful for batch-editing — e.g., multiply all scale keyframes by 1.5 to make an animation 50% bigger in one click.
- Loop expressions from the LOOP section write standard
loopOut("cycle")/loopIn("pingpong")/ etc. — compatible with any After Effects workflow and exportable. - Customize the panel heavily — the default enables a lot, but you probably only need 10-15 operations day to day. Turn off the rest for a focused workspace.
- Selection is preserved across most operations automatically, so you can chain actions like: Shift −5f, Distribute, Set to Bezier, Fix Overshoot — all without touching the timeline.
- Snap Keys to Frame is essential before exporting or rendering — sub-frame keys can cause subtle glitches in some workflows.