Ease
Interactive ease editor for keyframes with influence sliders, quick presets, interpolation type switching, and keyframe reversal. Read ease values from any selected keyframe, tweak them live, and apply with a single click — or jump straight to one of six curated presets.

Overview
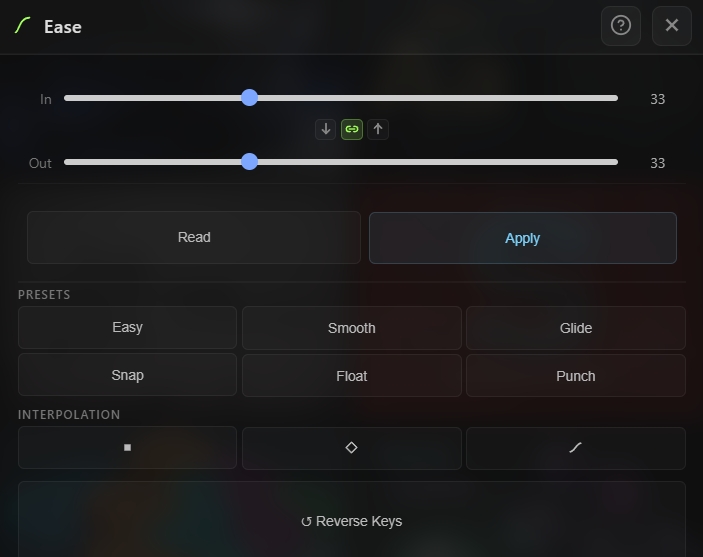
Ease is an interactive keyframe easing editor for After Effects. Fine-tune In and Out influence values with live sliders, read ease from any existing keyframe, apply your settings to multiple keyframes at once, or skip the sliders entirely and use one of six curated presets. The tool also lets you switch keyframe interpolation between Hold, Linear, and Bezier in a single click, and includes a Reverse Keys utility for flipping keyframe order in time. When In and Out are linked, moving one slider mirrors the other — perfect for symmetrical eases. Unlink them for asymmetric motion like snap-ins and float-outs.
Features
Influence Sliders
- In and Out ease influence sliders (0–100%)
- Live value display with draggable scrub and double-click-to-type input
- Link toggle — when active, moving one slider mirrors the other for symmetrical eases
- Copy In to Out and Copy Out to In buttons for quick mirroring without linking
Read / Apply Workflow
- Read — Pull the In/Out influence values from the currently selected keyframe into the sliders
- Apply — Write the current slider values to all selected keyframes at once
- Toast feedback confirms how many keyframes were affected
Ease Presets
Six one-click ease presets for common motion design needs:
- Easy — Easy Ease 33/33 (AE's default)
- Smooth — 60/60 for soft transitions
- Glide — 90/90 for heavy, slow motion
- Snap — 80/15 — sharp start, slow end
- Float — 15/80 — slow start, sharp end
- Punch — 90/40 for strong impact
Interpolation Type Switcher
Change the interpolation type of selected keyframes with a single click:
- Hold — Constant value until the next keyframe (no interpolation)
- Linear — Straight-line interpolation
- Bezier — Smooth bezier curve, automatically stamped with 33/33 ease so the result is a usable Easy Ease (not a flat bezier with zero influence)
Reverse Keys
- Reverse — Mirror the order of selected keyframes in time
- Requires 2 or more selected keyframes
- Preserves all keyframe values — only their temporal order is flipped
How to Use
1. Open the Ease tool from the Quick Tools menu or toolbar. 2. Read an existing ease: - Select a keyframe in the timeline - Click Read to pull its In/Out influence into the sliders 3. Adjust values manually: - Drag either slider, or drag the number value to scrub - Double-click the number to type an exact value - Toggle the Link button to keep In and Out in sync, or unlink for asymmetric eases 4. Apply to keyframes: - Select the target keyframes in the timeline - Click Apply to stamp your current values onto all of them 5. Use a preset (skip the sliders): - Select keyframes - Click any preset (Easy, Smooth, Glide, Snap, Float, Punch) to apply instantly 6. Change interpolation type: - Select keyframes - Click Hold, Linear, or Bezier in the Interpolation row 7. Reverse keyframe order: - Select at least 2 keyframes - Click Reverse Keys to mirror their order in time
Notes
- The Link toggle is on by default — this is usually what you want for symmetric eases. Turn it off when you need asymmetric motion like Snap (fast-in, slow-out) or Float (slow-in, fast-out).
- Read only pulls from the first selected keyframe, so if you have mixed eases in your selection, read will show you one sample — use Apply to normalize them all to the same values.
- Bezier interpolation automatically applies 33/33 ease because a flat bezier (0/0 influence) looks identical to linear in AE. This way, switching to Bezier always produces a visible ease.
- Reverse Keys flips temporal order only — keyframe values and eases stay intact. Great for reversing an entire animation without re-timing each key manually.
- Presets are perfect for consistent motion across a whole project — pick one preset as your "house style" and apply it everywhere.